To enable Valuekeep Analytics in a Private Cloud configuration follow these steps:
- Subscribe to Valuekeep Analytics directly from Valuekeep or through a Valuekeep partner. Valuekeep or the partner will send you a new license with the Valuekeep Analytics subscription;
- Update your Valuekeep license in the “Valuekeep Instance Manager”;
- From the “Valuekeep Instance Manager”, select the “Configure Valuekeep Analytics” option. On the screen select the “Enable Valuekeep Analytics” option;
To configure the Valuekeep Analytics reports follow these steps:
- Download and install Power BI Desktop [https://www.microsoft.com/en-us/download/details.aspx?id=45331];
To purchase the add-ons, on-premises customers must request the latest Power BI files from Valuekeep or speak directly with their partner. Partners have accesso to the VK Analytics modules.
- Download the Valuekeep Analytics add-ons to get reports. To do that follow these steps:
- Access and login on the Valuekeep website (valuekeep.com);
- From the menu bar, select “Add on”;
- Download the templates (.zip file).
- Open the file (.zip). There will be 3 folders, one for each support language (PT; ES; EN);
- Run the template for the report in the desired language with Power BI Desktop (for example: VALUEKEEP – EN – Assets);
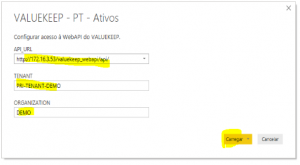
- Configure the access to Valuekeep’s WebAPI using these 3 parameters:
- API_URL: http://IP/valuekeep_webapi/api/, the IP can be replaced by the machine’s name
- TENANT: Database Name
- ORGANIZATION: Customer
- Select “Upload”;
- A new “Privacy Levels” window pops up where you need to select “Ignore Privacy Level checks (…)” and then “Save”.
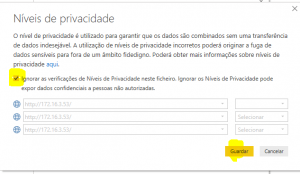 Note: if the system displays an error message after this step, ignore it and press “Close”
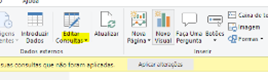
- From the top menu, access “Edit Queries” and select the “Data Source Settings”;
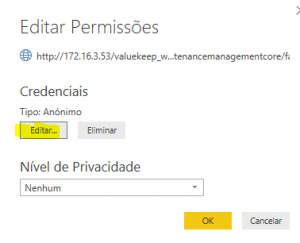
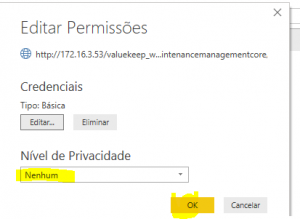
- Select “Data sources for the current file” and then “edit permissions” from the bottom corner;
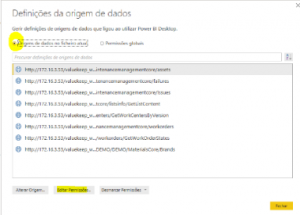
- In the “Edit Permissions” window, below the “Credentials” press “edit”;
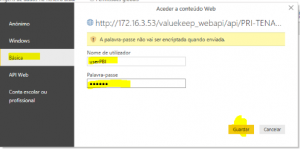
- A new “Access Web content” window will be displayed. Choose the “Basic” option on the left and enter:
- Username: userPBI
- Password: Set by the administrator (Note)
- Select “Save”;
- Check if the “Privacy Levels” are set to “none” in “Edit Permissions” and select “Ok”;
- Repeat this process for each data source (for example:
 );
);
- Lastly, “Close”.
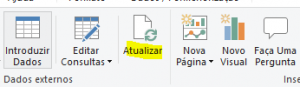
- Access the top menu and select “Refresh”.
 Note: In the solution, access the main menu, select “users”, edit the “userPBI” user and set the password in the “authentication” tab.